
How to Identify Real Users in Google Analytics Without Breaking Privacy Ru
As digital marketing evolves, so does the way we measure success. In an era where privacy is paramount and cookies are fading fast, businesses face a new challenge: identifying real users without crossing ethical or legal boundaries. In this guide, Emmanuel Adigun, Head, Design Engineer at Interswitch, breaks down how to use Google Analytics 4 (GA4) and Google Tag Manager (GTM) to accurately connect user journeys across devices – while staying fully compliant with privacy standards like GDPR. From cookies to User-ID, he takes us behind the scenes of analytics done right.
About the Author:
I’m Emmanuel Adigun, Head, Design Engineer at Interswitch, a leading player with critical mass in Africa’s rapidly developing financial ecosystem, and is active across the payments value chain, providing a full suite of omni-channel payment solutions.
I’m a solution-driven tech professional with deep experience in software development, martech, product management, and UI/UX design, crafting digital solutions that transform how businesses operate and connect with their customers.
Recognised with the AWS AI Hackathon Honorable Mention Award for innovation, I’ve built impactful products across payments, commerce, and marketing technology. Passionate about digital transformation and mentorship, I focus on developing scalable, intelligent solutions that tackle real-world challenges.
I’m currently exploring the power of AI to build MarTech solutions to help businesses grow and engage their customers effectively. You can join the waitlist here.
The Story of Google Analytics and Tag Manager
One of the most powerful tools that digital marketers, product teams, and researchers rely on today is Google Analytics. It’s like the compass that helps us navigate the digital world, showing where our users come from, what they do on our websites or apps, and what keeps them engaged.
Think of it this way: every click, scroll, or visit tells a story about how people experience your brand online. Google Analytics brings all those stories together so you can see the bigger picture, from how visitors find your site to how they interact with your content, and even which campaigns inspire them to take action.
How It All Began
Google Analytics didn’t just appear out of nowhere. It was launched in 2005, at a time when businesses were just beginning to realize how valuable website data could be. The goal was simple: to collect and analyse user data so that decisions could be based on insights, not just intuition.
But as websites grew more complex, adding all those tracking codes manually became a headache. So, in 2012, Google launched Tag Manager (GTM), a tool that made life easier for marketers and developers. Instead of diving into code every time you wanted to track something, GTM became the control centre where you could manage all your tags, including Google Analytics, Google Ads, Facebook Pixel, and more in one place.
The Cookie Era
In the early days, tracking users online depended heavily on cookies, small text files that websites stored in your browser. These cookies helped identify you (or rather, your browser) each time you visited a site.
Using cookies, Google Analytics could track what pages you visited, how long you stayed, and what you clicked on. It was like leaving digital breadcrumbs wherever you went, and those breadcrumbs helped businesses understand what was working and what wasn’t.
However, there was one big limitation: cookies tracked sessions, not people. So, if you visited the same website from your laptop in the morning and your phone in the evening, Google Analytics might see that as two different users instead of one person visiting twice.
Sessions: The Building Blocks of User Activity
In Google Analytics, a session is simply a group of interactions like page views, clicks, or form submissions that happen within a certain time frame. It’s activity-based, which means the clock starts ticking when a user visits the site and resets after a period of inactivity (usually 30 minutes).
Cookie-based tracking stitched those interactions together, showing what happened during each visit. It wasn’t perfect, but for a long time, it gave marketers and product teams just enough visibility to make meaningful decisions.
A Changing Landscape
Fast forward to today, and the world has moved toward privacy-first tracking, and the way we collect data is evolving. But understanding the roots of tools like Google Analytics and Tag Manager helps us appreciate just how far we’ve come from simple cookies and sessions to user-centric analytics that prioritize both insights and privacy.
Let’s look at the illustration below
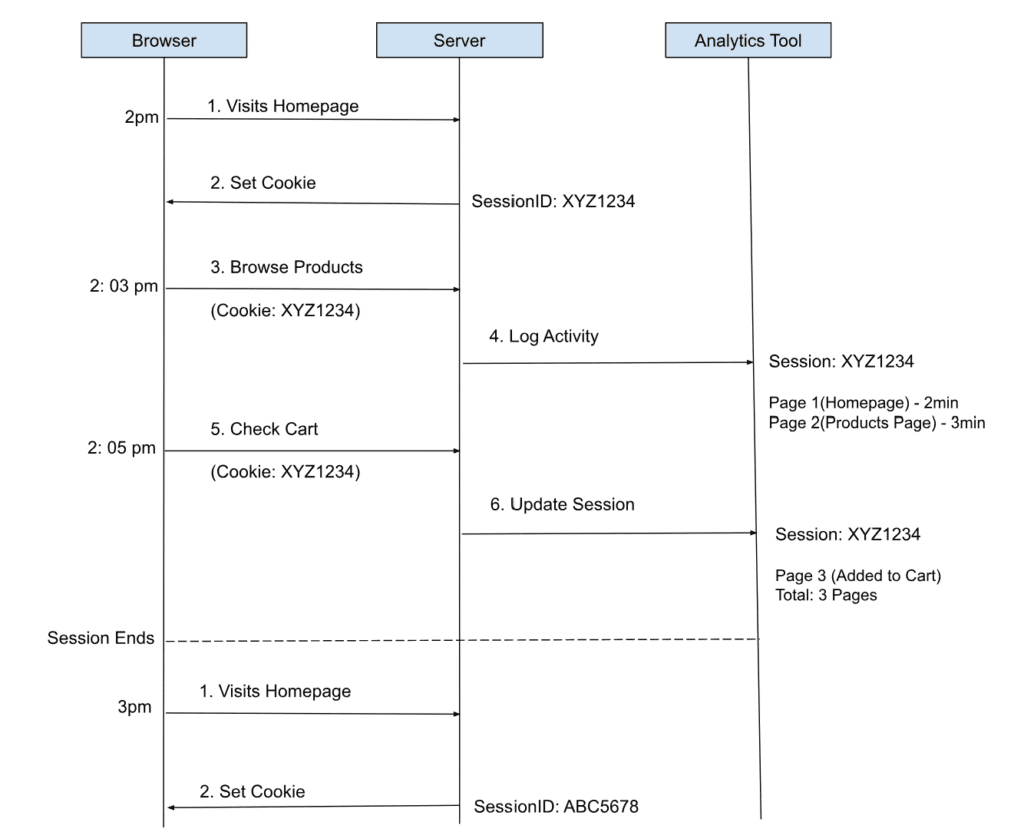
The diagram above explains how cookie-based session tracking works.
First Session (2:00 PM – 2:05 PM)
- Visits Homepage (Browser → Server)
The user opens the homepage for the first time.
- Set Cookie (Server → Browser)
The server responds by setting a cookie in the browser with a unique SessionID: XYZ1234.
→ This cookie helps identify that the same user is continuing the same session.
- Browse Products (Browser → Server)
The user browses the product page. The browser automatically includes the cookie (XYZ1234) with the request.
- Log Activity (Server → Analytics Tool)
The server logs this interaction to the analytics tool, noting that the user (Session XYZ1234) spent 2 minutes on the homepage and 3 minutes on the product page.
- Check Cart (Browser → Server)
The user checks their cart. The same cookie (XYZ1234) is sent again.
- Update Session (Server → Analytics Tool)
The analytics tool updates the session details:- Page 3: Cart Page
- Total Pages: 3
- Total Session Duration: ~5 minutes
New Session (After Session Timeout at 3:00 PM)
When the session ends (either by user inactivity or timeout):
- The user revisits the homepage at 3:00 PM.
- The server sets a new cookie with a new SessionID: ABC5678.
→ To analytics, this is a new session, even though it’s the same user.
Why do most analytics setups mistake sessions for real users
Analytics platforms are designed to track browsers and devices, not people. Since they can’t see the actual human, they use a “proxy.” The most reliable proxy they have is the browser cookie.
The term “Users” in reports is technically accurate from a data model perspective, but it’s psychologically misleading for anyone trying to count people.
| What the Report Says | What It Actually Means |
| 1,000 Users | 1,000 unique browser instances (often across multiple people) |
| 1,500 Sessions | 1,500 individual visits from those browsers |
Cross-Device Fragmentation (The “Family Computer” Problem)
One Person = Multiple “Users” in Analytics
# Scenario: One person, John
John’s Laptop (Chrome) -> Analytics sees: “User A”
John’s Phone (Safari) -> Analytics sees: “User B”
John’s Tablet (Firefox) -> Analytics sees: “User C”
John on Incognito Mode -> Analytics sees: “User D”
Cookie Deletion & Private Browsing
Every time a user clears their cookies or uses private browsing, they get a new cookie and are counted as a new user.
Monday: First Visit
Cookie: user_id = “ga_123”
Tuesday: After clearing the cache
Cookie: user_id = “ga_456” // <– Analytics sees a New User!
Real Person Count: 1 / Reported User Count: 2
Next, I will show how you can know your real users on Google Analytics 4. We will do a match between the data on GA4 and our database.
If Google Analytics (GA) is the brain that gives you insights, then Google Tag Manager (GTM) is the nervous system that sends it the right signals. GTM makes it incredibly easy to send data to GA and even other platforms like Google Ads or Facebook Pixel without touching your website’s code every time. It’s like having a translator between your website and your analytics tools, making sure everything speaks the same language.
Now, one big question in analytics has always been: How do we know who’s actually visiting our website?
Google Analytics has a few tricks up its sleeve. Traditionally, it relied on browser cookies, those tiny text files that remember you when you come back to a site. They’ve been the go-to method for tracking returning visitors and understanding user behavior.
But there’s a catch. If a user clears their cookies, switches browsers, or signs in from another device, GA can’t recognize them anymore. To Google Analytics, that’s a brand-new visitor.
That’s where User ID comes in.
With GA4, things got smarter. Instead of letting Google decide who a user is, you, the website or app owner, can provide a User ID from your own system.
Think of it as giving GA4 a custom label for each user. When someone logs in, your system generates a unique identifier, usually a non-personal, auto-incrementing ID from your database (like a customer ID). GA4 doesn’t need personal info like emails or names, just that unique ID.
This is important because it allows GA4 to connect the dots across devices. So, if the same person logs in from their laptop at work and their phone at home, GA4 knows it’s the same user, not two separate visitors.
By assigning your own User ID, you’re giving Google Analytics a more accurate way to understand the entire customer journey from the first website visit to conversions across multiple devices. It bridges the gap between fragmented sessions and paints a clearer picture of how real users interact with your business.
Now let’s dive into the action
First of all, ensure your GTM script is added to your website.
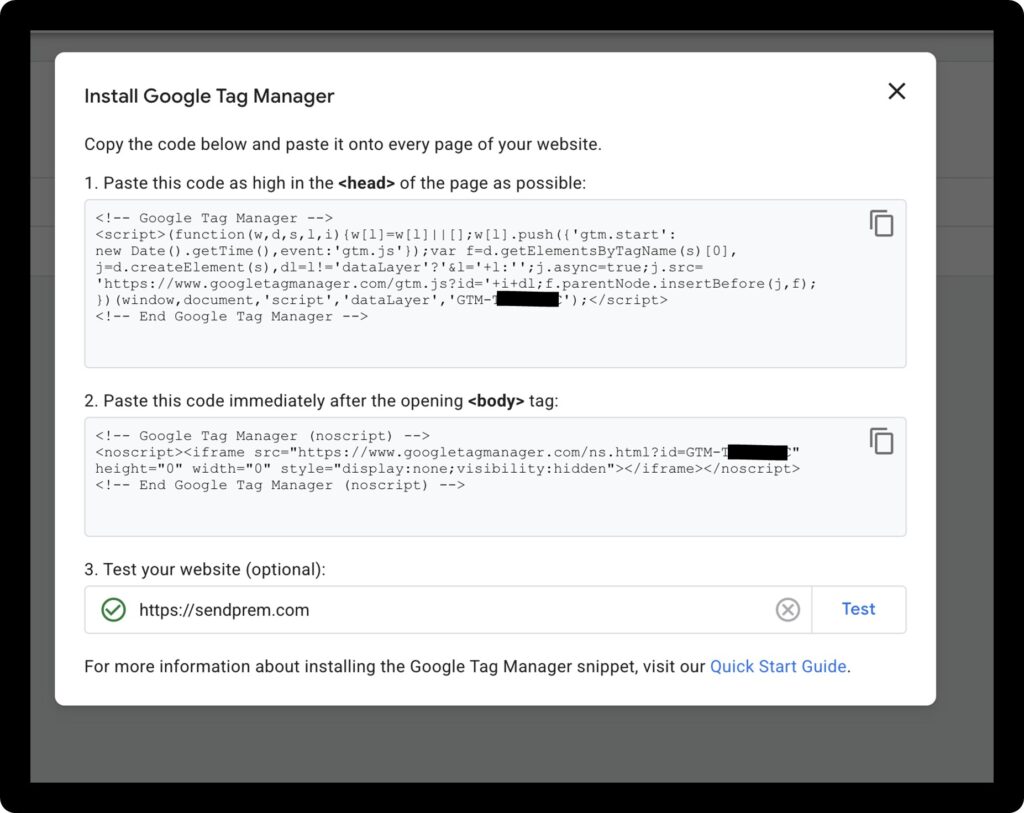
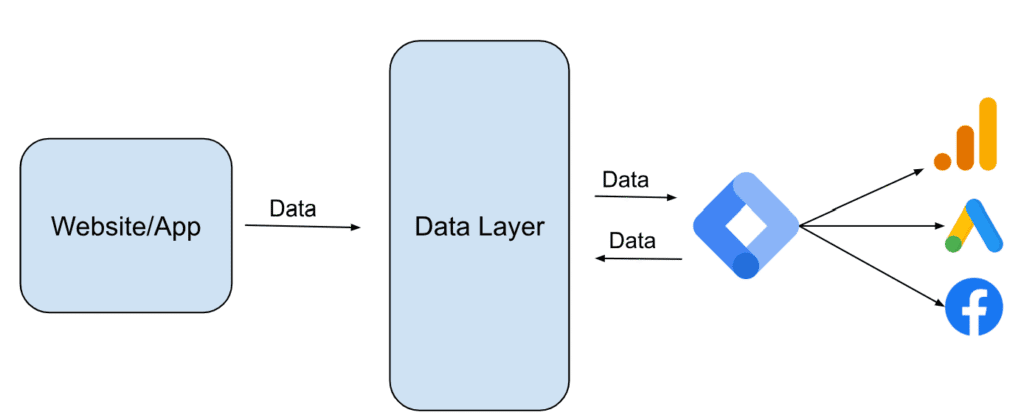
If you are not a developer, tell a developer to push the User ID to the Data Layer.
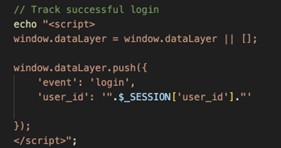
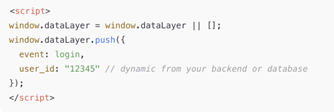
Technically, Data Layer is a JavaScript object that stores and passes customers’ data. It acts as an intermediary between your website or app and other tools like Google Analytics, Google Ads, Facebook Pixel, etc. A data layer is a data structure on your site or app that holds the information you want to process and sends it to other applications. It enables tools like Google Tag Manager to track user interactions on your website or app. Events and Variables can be passed via the data layer. From the code snippet above, you will observe that the event created is called “login”, and then we are getting the signed-in user_id from the session and passing it to the key ‘user_id’. What we want to do is to send the user_id to GTM anytime a user signs in. This user_id can be seen on GA4 reports, and then we can do a match with what’s in our database.
The next step is to create a GA4 Tag in GTM.
Here, we will be creating a GA4 Tag in GTM.
Let’s first create our Trigger and Variable. Still on your GTM workspace,
- Go to Triggers → New
- Choose Custom Event
- Event Name: login
- References to the Trigger: Here, you will select the GA4 Tag that will be created
- Save as “LoginTrigger”
Let’s create our Variable
- Go to Variables → New
- Choose Data Layer Variable as the Variable Type
- Data Layer Variable Name: user_id (This is the name that you are passing to your Data Layer on your website)
- References to this Variable: Here, you will select the GA4 and Google Tags that will be created
- Save as “userID”
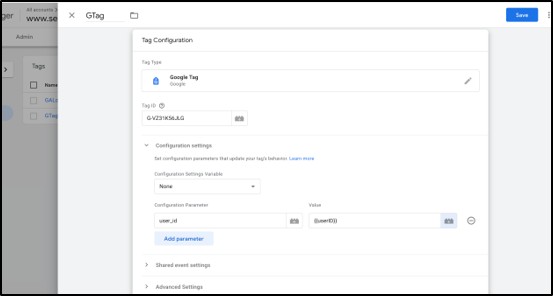
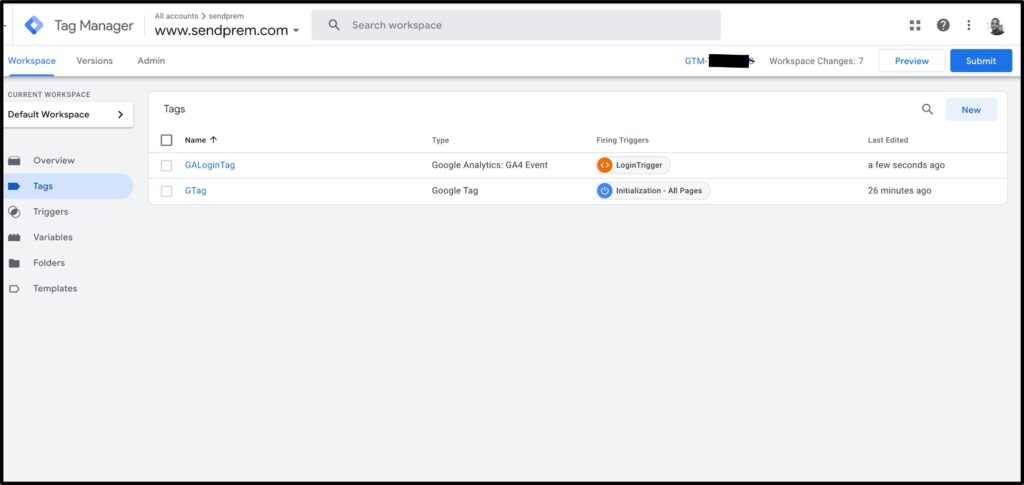
We have successfully created our Trigger and Variable, which we will use in the GA4 Tag. Let’s proceed to create the GA4 Tag. Before then, we will create a Google Tag, as it will be needed when creating the GA4 Tag.
- Go to Tag → New
- Tag Configuration → Google Tag
- In the Tag ID, enter your measurement ID – G – XXXXXXX
- Click Configuration Settings and then under the Configuration Parameter, click Add Parameter and add the “user_id” and the variable name we created
- Save as “GTag” or whatever you wish to name it
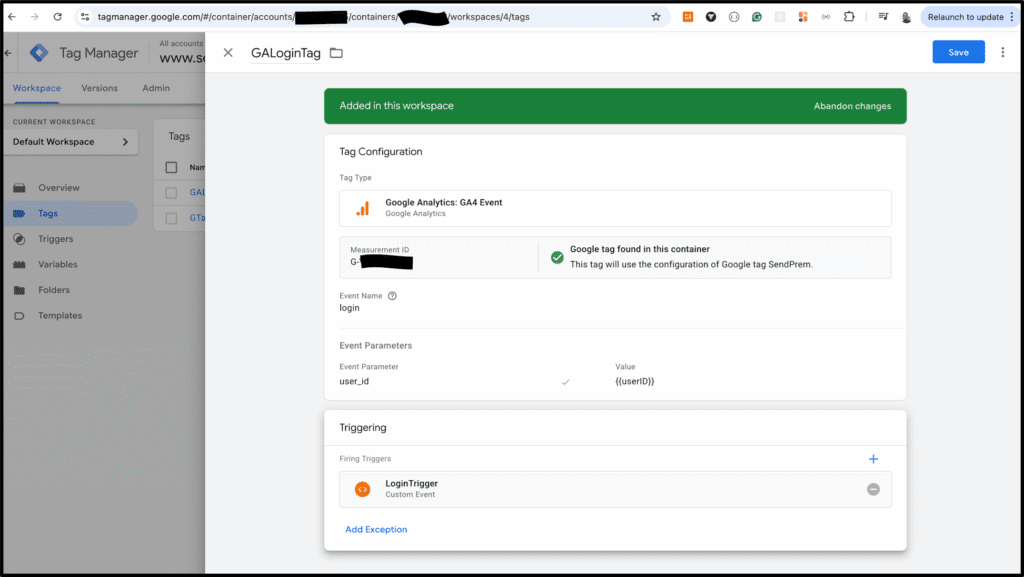
Let’s now proceed to create our GA4 Tag
- Go to Tag → New
- Tag Configuration → Google Analytics: GA4 Configuration
- In the Tag ID, enter your measurement ID (G-XXXXXX), which automatically confirms the Google Tag created above.
- Click Configuration Settings and then under the Configuration Parameter, click Add Parameter and add the “user_id” and the variable name we created
- In the Trigger section, add the “loginTrigger” created earlier
- Save as “GALoginTag” or whatever you wish to name it
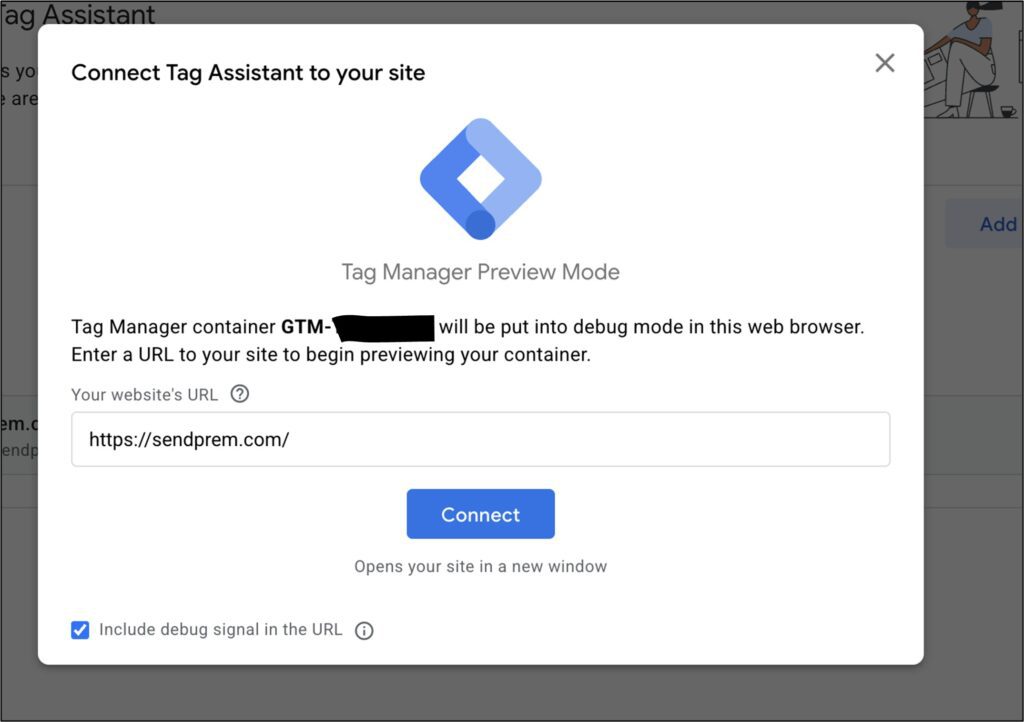
Now, it’s time to preview your setup. Click the Preview button in Google Tag Manager. This will open Tag Assistant, which attempts to connect to your website.
Enter your website URL, and Tag Assistant will validate whether the GTM tag is correctly installed. Once the validation is successful, your website will load in preview mode.
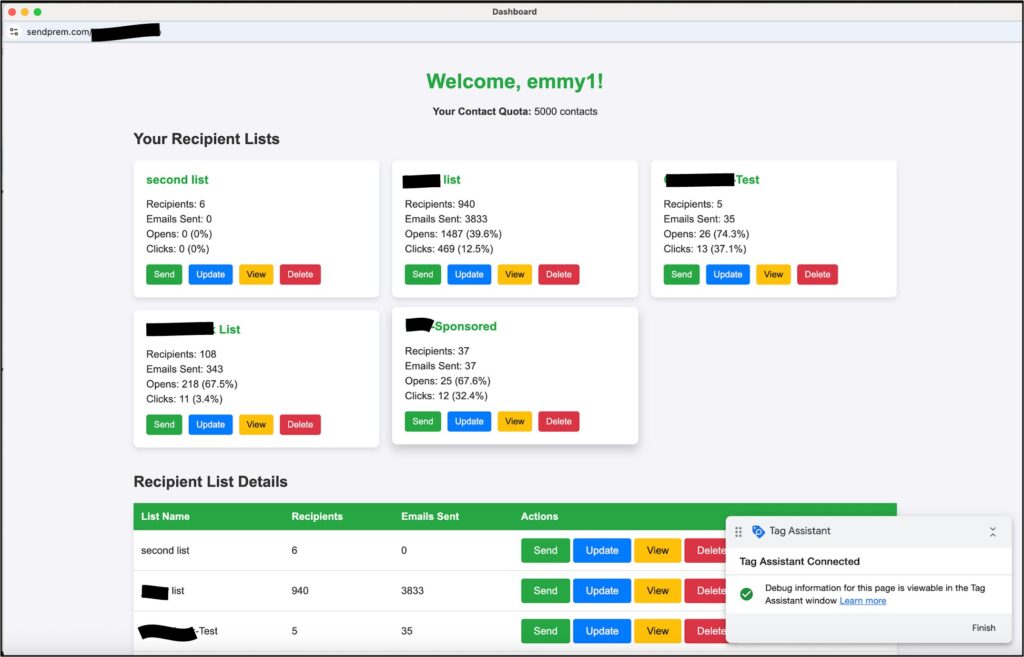
Next, log in to your website in preview mode so that the tag can capture the stored user_id from the data layer.
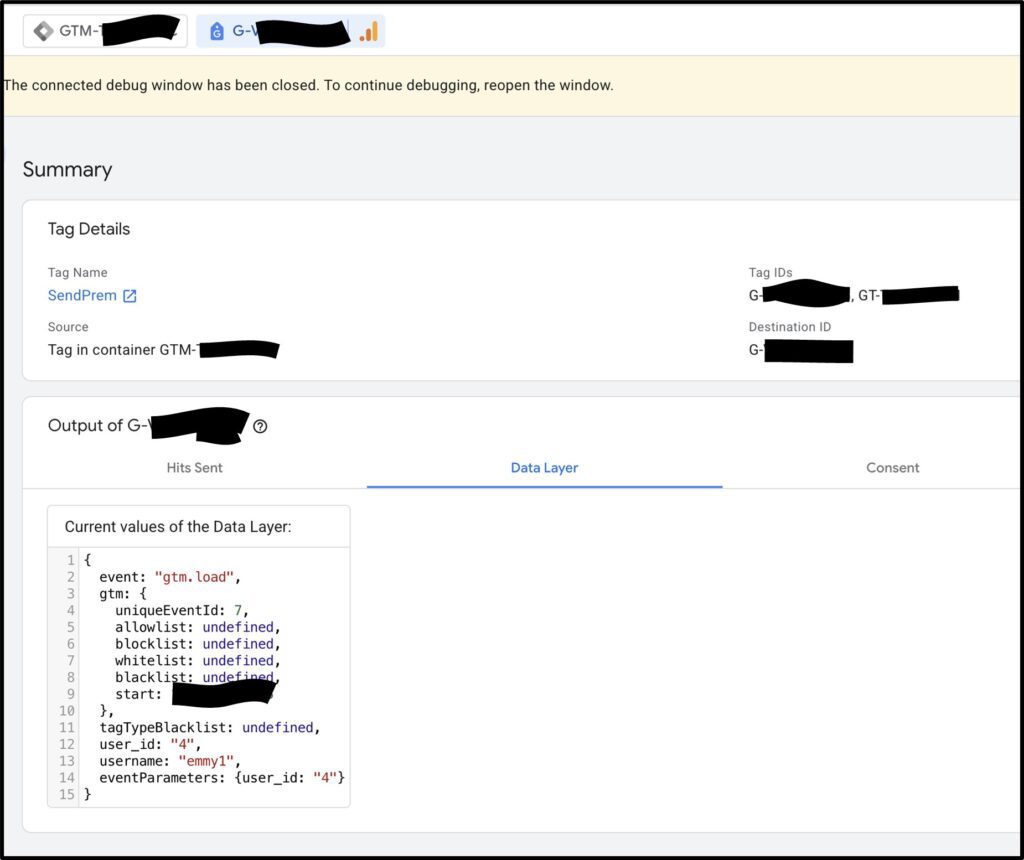
Finally, return to the Tag Assistant window, click Finish, and you’ll see a detailed summary of the triggered events.
To see the summary, click the “Finish” link at the bottom right of the Tag Assistant pop-up displayed on your screen. From the summary, you will see user_id with the value 4 from our login event that occurred on the website. Please note that under Google Analytics’ Terms of Service, the collection and storage of Personally Identifiable Information (PII), including email addresses, social security numbers, and similar sensitive data, is strictly prohibited on their servers. While you can use a user_id for cross-device tracking, ensure it’s an anonymous internal identifier, not an email, username, or other PII that could identify individuals personally.
Finally, we can now view our data live in GA4.
After submitting and publishing your changes in Google Tag Manager (GTM), it may take 24 to 48 hours for your data to fully reflect in the GA4 reports.
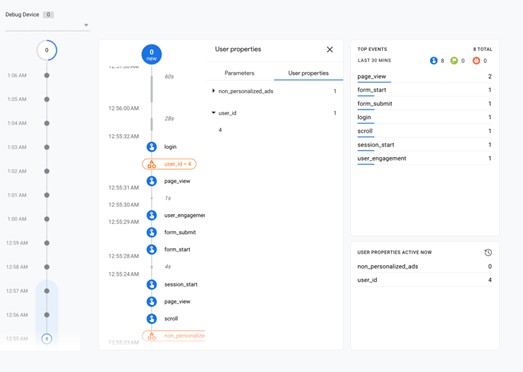
- To confirm your setup immediately, use the DebugView:
- In GA4, go to Admin → Data Display → DebugView.
- On the timeline, you should see your event appear, for example, the ‘login’ event with the corresponding ‘user_id’ = 4.
- You can also expand the User Properties section to verify that the same user_id value is displayed.
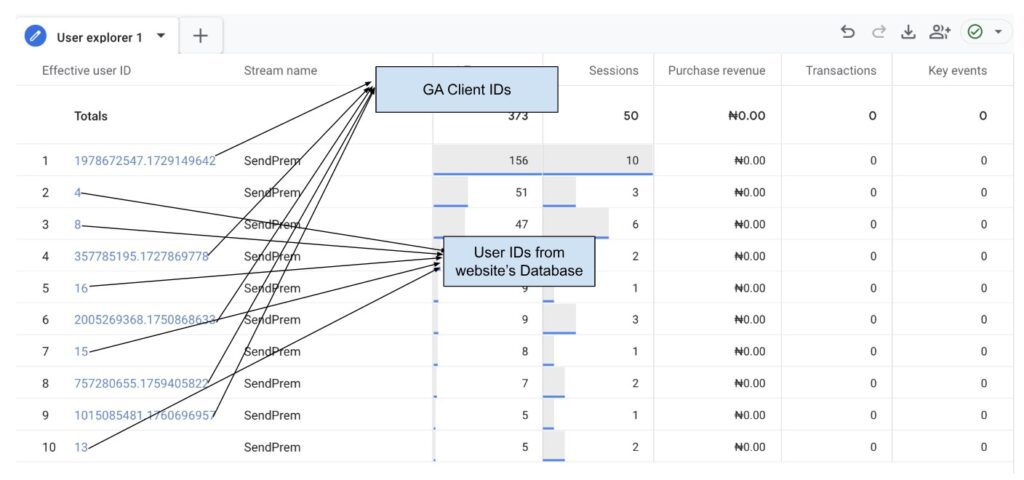
- Next, go to Explore → User Explorer to see your real user IDs. Each logged-in user is listed with their unique user_id and the automatically generated client_id.
- If you cross-check the user_id = 4 from GA4 with your database, you’ll notice it matches the same user in this case, the username “emmy1”.
This confirms that we’ve successfully sent and matched the user_id from our database to GA4.

Conclusion
UserID implementation is one of the most valuable upgrades you can make to your marketing analytics stack. It improves attribution accuracy by solving critical tracking problems. For example, without the userID, GA identifies users as new on different devices, but with the userID, you can tell the same user on mobile is on desktop. This helps in mapping the complete user journey and giving credit to all touchpoints. Secondly, it links Anonymous to a known behaviour, which you can track and map the behaviour on your website to a real user. Marketing channels that drive top-of-funnel awareness finally get credit for conversions that happen later.
A big thank you to Emmanuel Adigun for offering such a clear and practical take on the future of analytics in a privacy-first world. As businesses seek to understand customers across an increasingly fragmented digital landscape, Emmanuel reminds us that true insight doesn’t come from more data – but from meaningful connections. His approach shows how smart implementation of tools like GA4 and GTM can move us beyond browser-based guesswork to real, responsible user understanding. With the right setup, analytics becomes not just a reporting tool, but a bridge between brands and the people they serve.
Join Us Now!
Ready to elevate your marketing strategy? Be part of our Upcoming Events – where innovation, networking, and cutting-edge insights meet in vibrant cities around the world. We can’t wait to welcome you in person!
Can’t attend in person? No problem. Join BEETc On-Screen, our On-Demand Learning Platform, for exclusive access to 500+ sessions and over 300 hours of content from global summits. Upskill at your own pace, gain actionable insights, and stay ahead in a rapidly evolving business landscape.
Stay up to date with our In Person Summit, Session Information, and Agenda Updates by following us on:
See more MarTech Thoughts Content/ Interview pieces here!
Last updated:November 2025